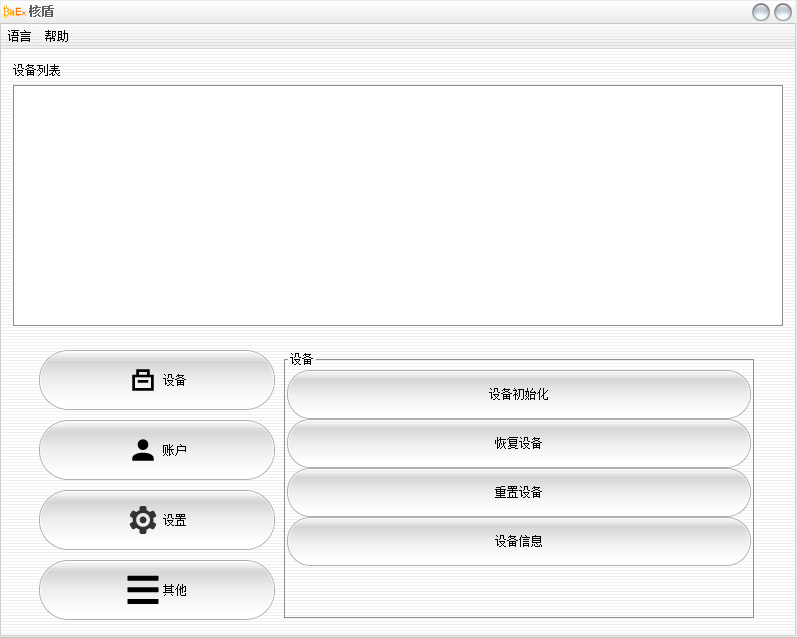
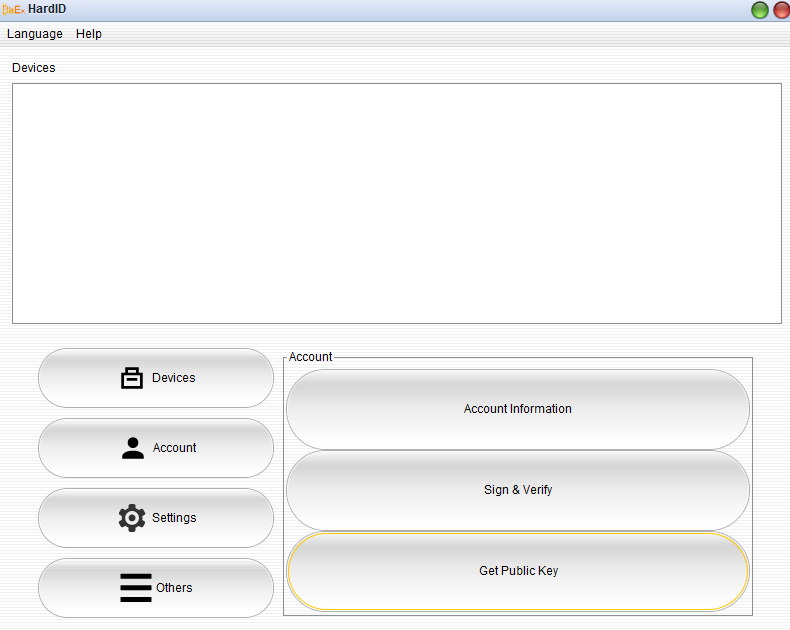
0.钱包介绍 Wallet Introduction
0.1关于必易核盾硬件钱包About BitExchange HardID Hardware Wallet
必易核盾硬件钱包是一款带有存储和计算能力的比特币硬件钱包。登录www.hardid.org,通过必易核盾硬件钱包可以安全便捷地管理您的比特币。必易核盾硬件钱包内部完成私钥的生成、保存和签名计算。管理比特币的整个过程从物理层面隔离保护您的私钥,从而大幅度提高资金的安全性,同时有最方便的用户体验。
BitExchange HardID Hardware Wallet is a kind of bitcoin hardware wallet with storage and computing power. Log in www.hardid.org , your bitcoin can be conveniently and safely managed through BitExchange HardID Hardware Wallet equipment. Private key’s generation, storage and signature calculation in BitExchange HardID Hardware Wallet can be finished. In the whole management process of bitcoin, private key is protected from the physical isolation, which significantly improve the security of funds.And having the most convenient user experience at the same time.
0.2 www.hardid.org
www.hardid.org是为必易核盾硬件钱包专门设计的轻量级在线钱包。网站不记录任何用户数据,仅提供区块链数据服务。即使是公钥,也只是保存浏览器本地缓存,并且用户可以根据需要选择“是否记住”这些信息。
www.hardid.org is lightweight online wallet specially designed for BitExchange HardID Hardware Wallet. Website does not record any user data, only provides blockchain data services. Even for the public key, it just saves the local browser cache, and the user can choose to “remember” the information according to needs.
0.3 配置Configuration
必易核盾硬件钱包采用0.96寸128*64分辨率,OLED单色屏显示信息,外壳采用不锈钢外壳配以康宁大猩猩玻璃做保护屏,操控按钮为触摸按钮,一键更新键,可做到:防尘、防摔。 BitExchange HardID Hardware Wallet adopts OLED monochrome screen with 0.96 -inch and 128 * 64 resolution to display information, shell adopts stainless steel case with gorilla glass as protection screen, control button is touch button, update key,and it has these functions such as dust-proof and fall resistance.
*由于产品的不断改进,如本手册中的技术参数被修改,恕不另行通知。
*Due to the continuous improvement of products, such as the technical parameters in this manual are modified without prior notice.
1.快速入门
1.1 下载离线工具箱 Download the offline toolbox
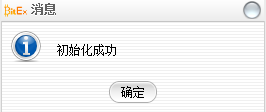
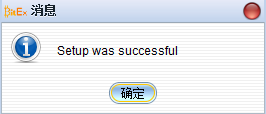
1.2 初始化BitExchange核盾钱包 Initialization of a Bitexchange HardID Wallet
运行离线工具箱Running the offline toolbox
连接BitExchange核盾钱包和电脑,并按照下图操作
Connect wallet and computer, and following the steps:
继续:
Continued:
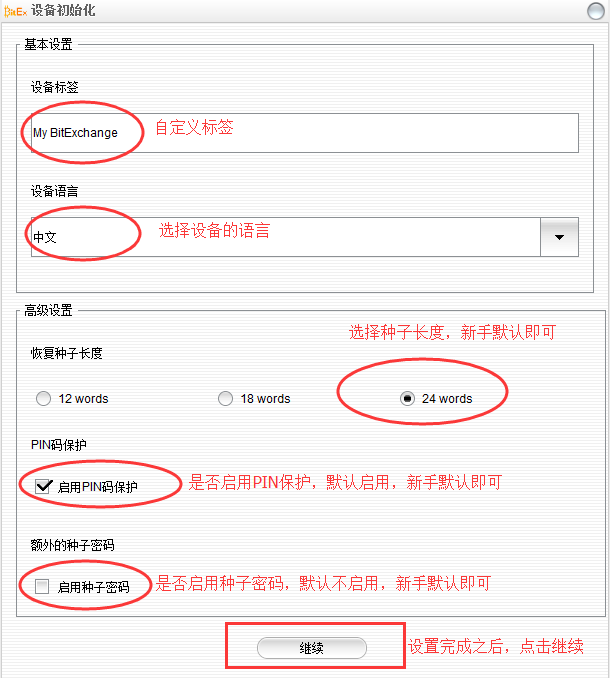
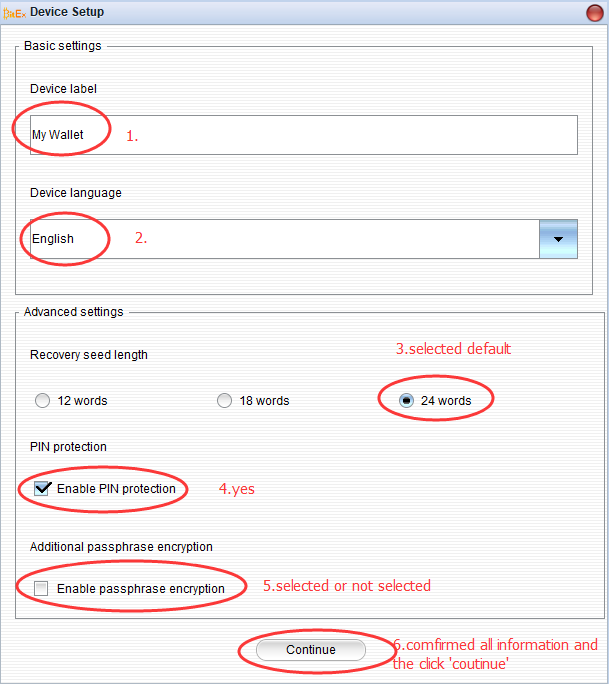
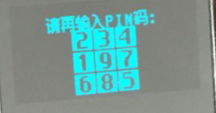
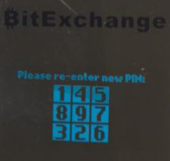
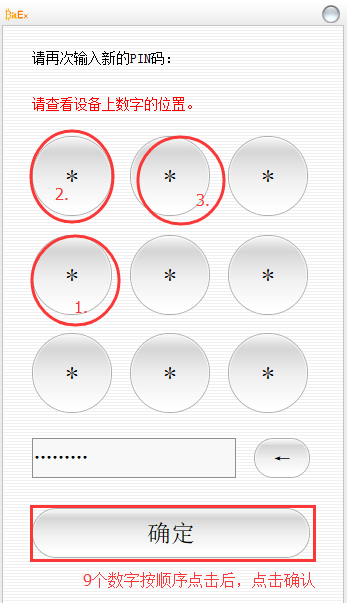
继续之后会要求用户设置PIN码,需要配合BitExchange核盾钱包 屏幕显示,以PIN为例,按图的顺序点击:
After continuing, the user will be required to set up the PIN code, and need to match the screen display of the Bitexchange HardID wallet.Take the PIN as an example, click the order of the pictures:
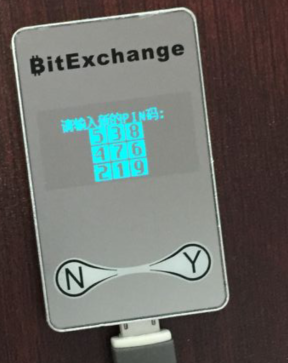
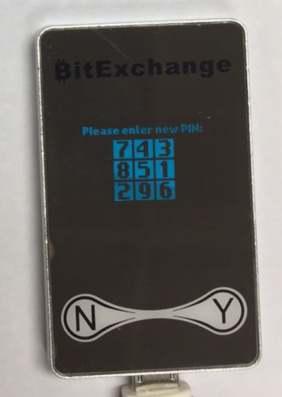
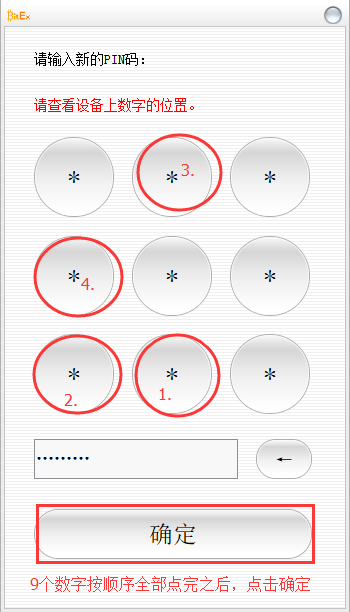
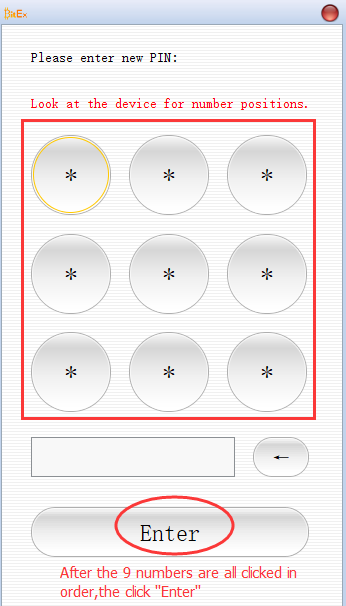
点击确认之后,会要求再输入一次,这是BitExchange核盾钱包 设备上的九宫格是变动过一次的。
after the 9 numbers are all clicked in order, then click confirm.
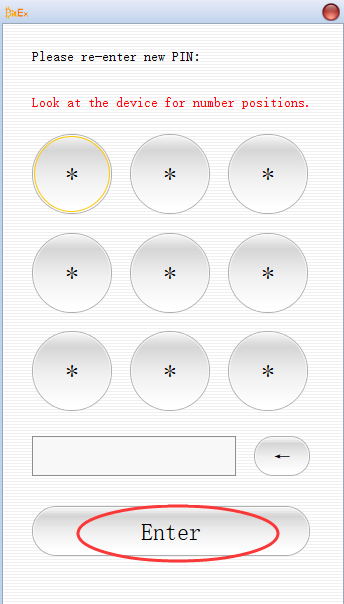
再次输入PIN码,正确之后会出现下面的界面:
Enter the PIN again and the following screen will appear after correct:


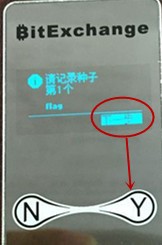
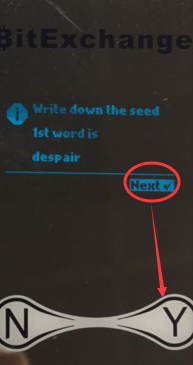
这是让用户记录钱包的种子,看BitExchange核盾钱包 设备:
Here is the seed word that lets the user record the wallet and see the wallet screen:
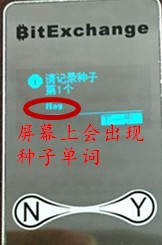
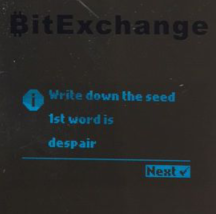
拿出BitExchange核盾钱包 包装中的种子卡,依次记录好。
Take out the seed card in the package and record it in turn.


每记录好一个之后,按“下一步”
After each word is recorded, press “Next” for a total of 24 words.
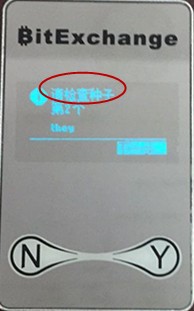
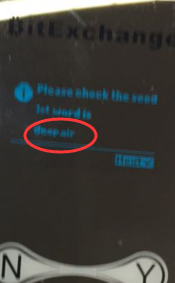
全部种子记录完之后,BitExchange核盾钱包 会重新显示一遍所有种子,用下一步依次检查。
After all the seeds have been recorded, the wallet will show all the seeds again and click next to check it.
请注意:记录种子卡的过程非常重要,种子卡以后恢复钱包必须的。拥有种子卡就等于拥有您的钱包。请 务必为您的种子卡做好保密和保护工作。 请注意:记录种子卡的过程非常重要,种子卡以后恢复钱包必须的。拥有种子卡就等于拥有您的钱包。请 务必为您的种子卡做好保密和保护工作。 请注意:记录种子卡的过程非常重要,种子卡以后恢复钱包必须的。拥有种子卡就等于拥有您的钱包。请 务必为您的种子卡做好保密和保护工作。
Please note: The process of recording the seed card is very important, and the seed card must be used to recover the wallet later. Having a seed card is equivalent to having your wallet. Please be sure to keep your seed card confidential and protected. Please note: The process of recording the seed card is very important, and the seed card must be used to recover the wallet later. Having a seed card is equivalent to having your wallet. Please be sure to keep your seed card confidential and protected. Please note: The process of recording the seed card is very important, and the seed card must be used to recover the wallet later. Having a seed card is equivalent to having your wallet. Please be sure to keep your seed card confidential and protected.
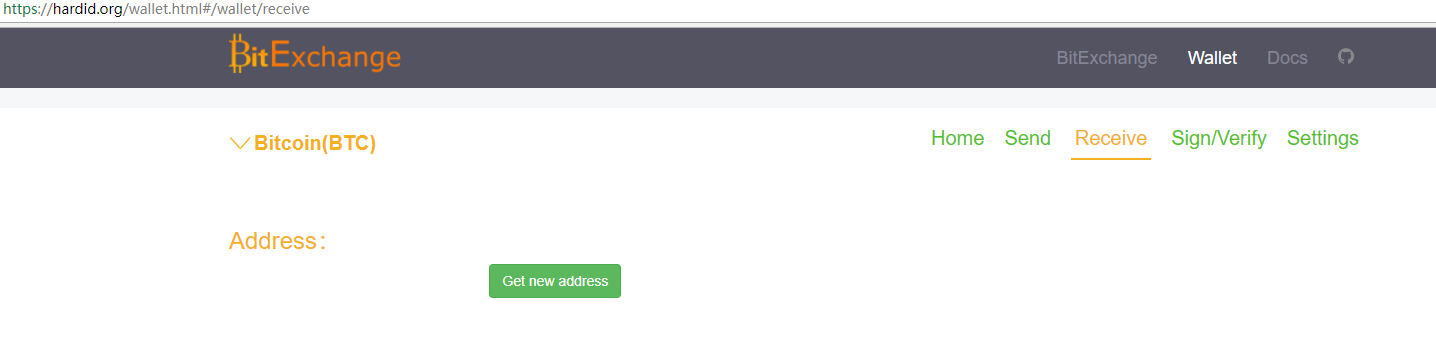
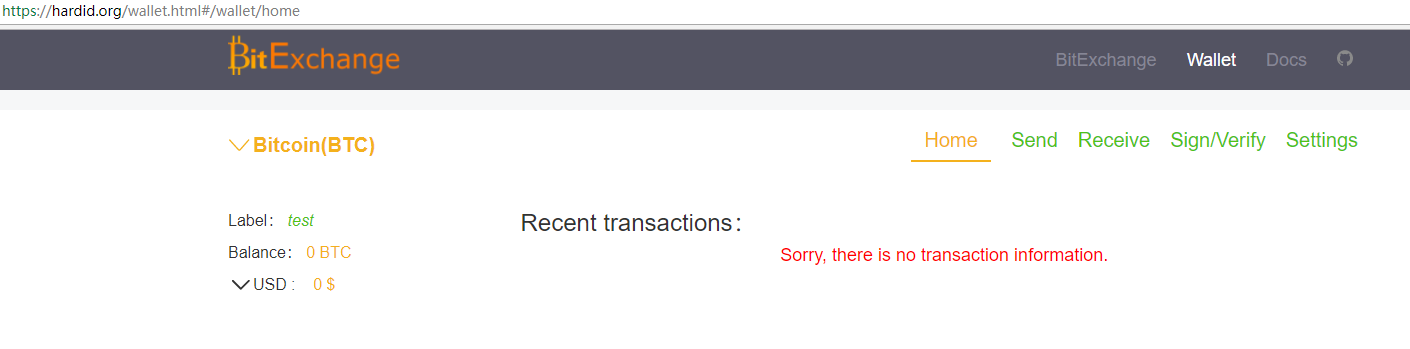
1.5 接收比特币 Receive Bitcoin
登录www.hardid.org,此时钱包已经成功连接电脑
Log in to www.hardid.org and the wallet has been successfully connected to the computer
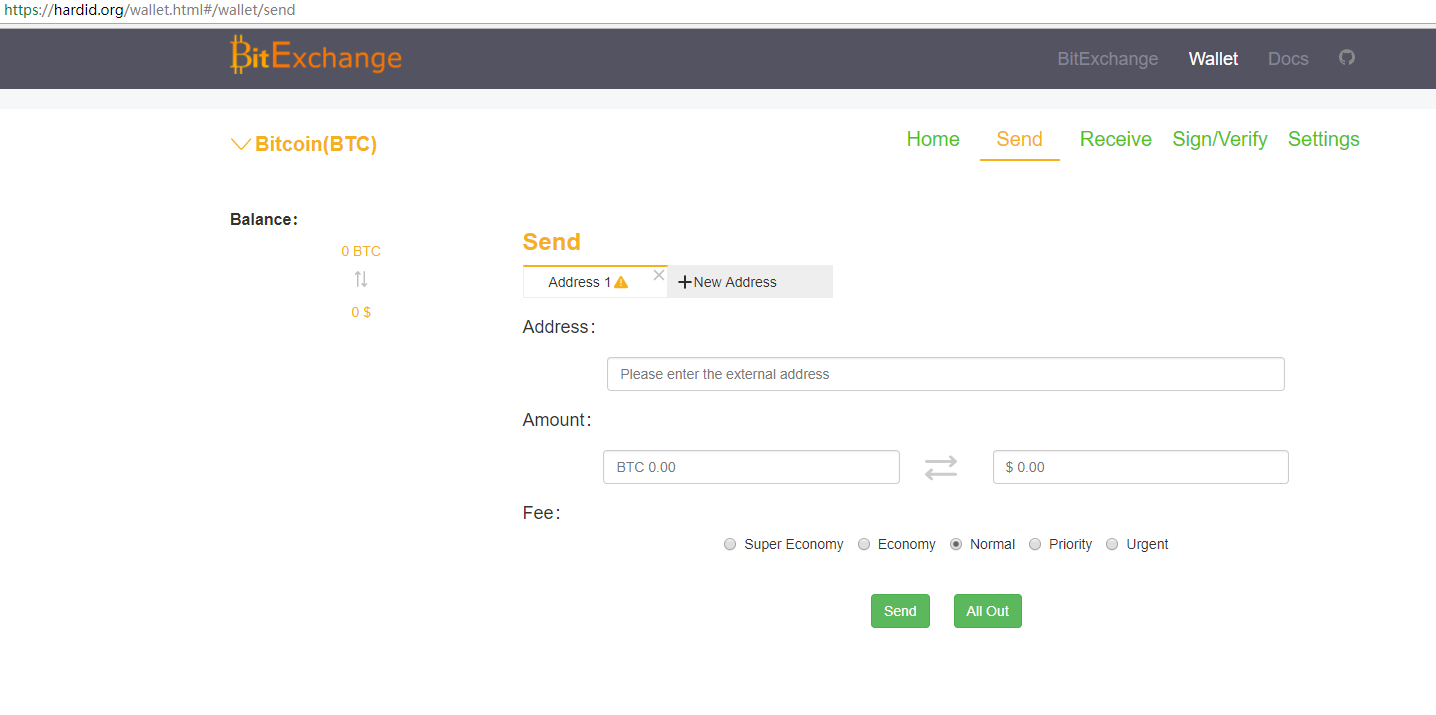
1.6 发送比特币 Send Bitcoin
登录www.hardid.org,此时钱包已经成功连接电脑
Log in to www.hardid.org and the wallet has been successfully connected to the computer.
2.离线工具箱 The Offline Toolbox
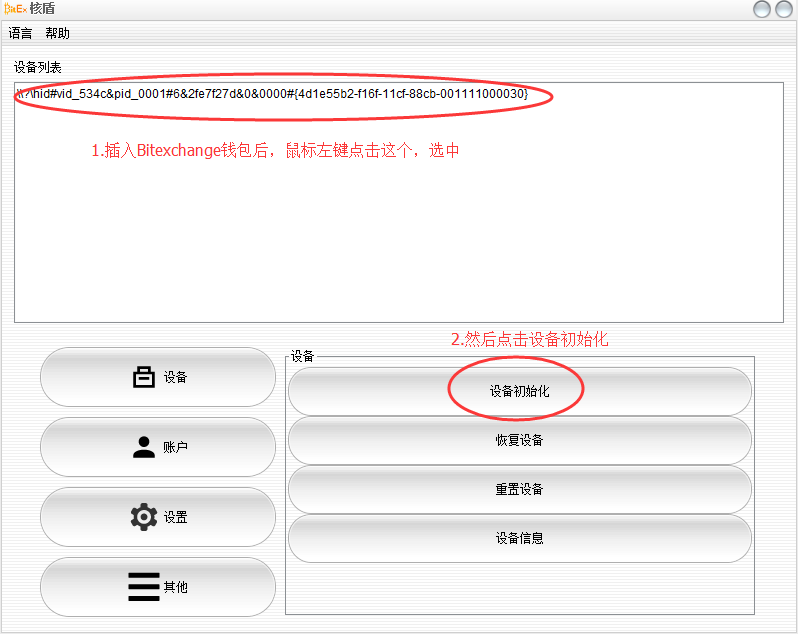
2.1 初始化设备 Initialization of a Bitexchange HardID Wallet
在快速入门中已经详细描述过,不再重复,请查阅1.2
It has been described in detail in the quick start. No more repetition. Please refer to 1.2.
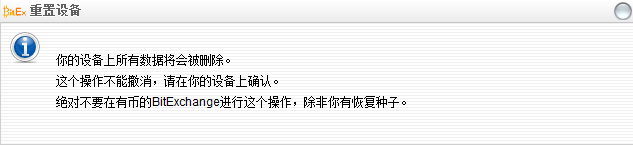
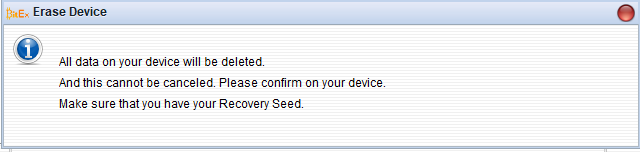
2.2 重置设备 Resetting the device
重置设备,即恢复出厂设置,将抹去所有用户数据。 Resetting the device which is restoring the factory settings, will erase all user data.
请谨慎操作!!!如果一定要操作,请务必确认您的种子卡保存完好。如果种子卡遗失或模糊不清,请转移您的比特币之后再执行此操作。
Please be careful! ! ! If you must do it, please make sure that your seed card is in good condition. If the seed card is missing or obscure, please transfer your Bitcoin before performing this operation.The best way is transfer your all bitcoin firstly and then to resetting the wallet.
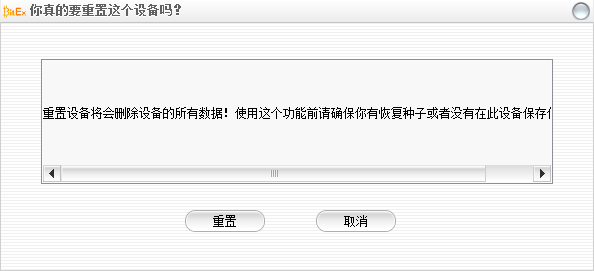
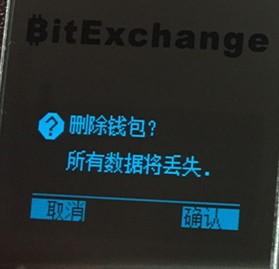
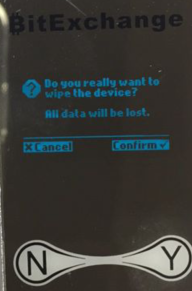
点击“重置”按钮之后,再次提示并要求BitExchange核盾钱包 设备上按钮确认。
After clicking the “Reset” button, it prompts again and asks for confirmation on the device by clicking the button.
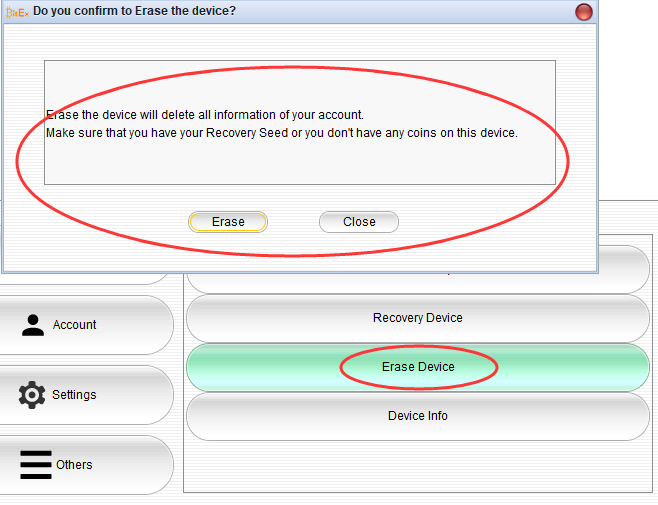
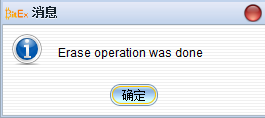
BitExchange核盾钱包设备按钮确认之后显示“重置成功”
After confirmation, “Reset Successful” is displayed.

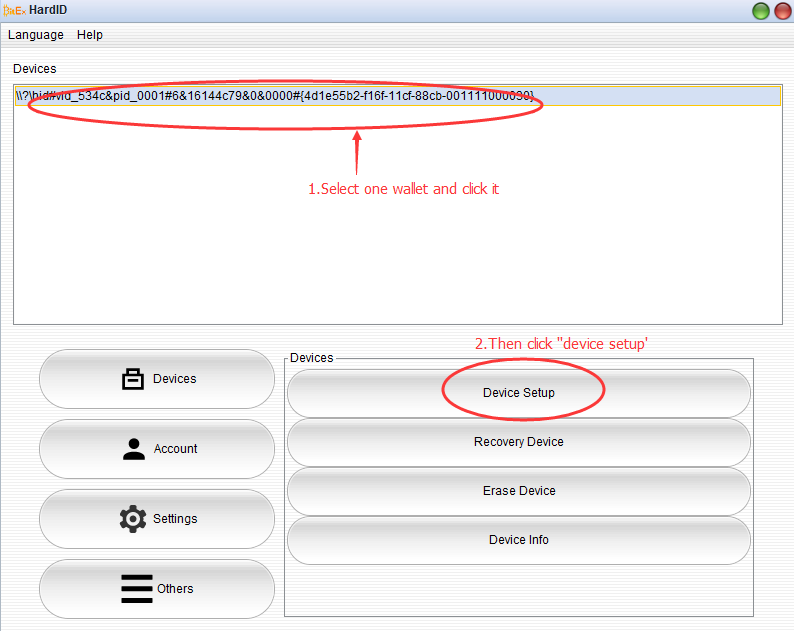
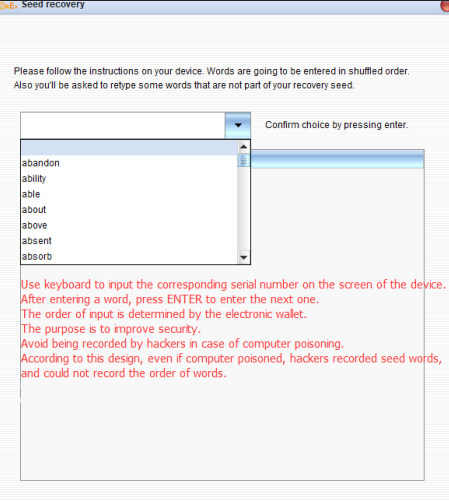
2.3 恢复设备Recovery Wallet
执行此项操作需全新的BitExchange核盾钱包 ,已初始化的钱包不能进行此项操作。 如果您执意要覆盖您已初始化的钱包,那么需要先重置设备才能执行此项操作。重置设备请查阅2.2,并认真阅读注意事项! 通过恢复设备,您可以实现多个设备使用同一套种子卡。这样就可以实现BitExchange核盾钱包 硬件上的一个备份。比如您想:保险箱放一个BitExchange核盾钱包 ,办公室放一个BitExchange核盾钱包 ,随身携带一个BitExchange核盾钱包 。 顾名思义,要执行恢复设备的操作,首先您要找到目标钱包的种子卡:
A new wallet is required to perform this operation. The initialized wallet cannot perform this operation. If you insist on covering the wallet that you have initialized, you need to reset the device to perform this operation. Please refer to the reset device 2.2 and read the attentions carefully. By restoring the device, you can use the same set of seed cards for multiple devices. For example, you would like to: put a wallet in a safe, an electronic wallet in the office, and carry an electronic wallet with you. As the name implies, to perform operations on the recovery device, you first need to find the seed wallet for the target wallet: Select the number of seed words, novice default. Whether to enable PIN protection, enabled by default. Whether to enable seed password, not enabled by default.


点击“恢复设备”按钮
Click the “restore device” button
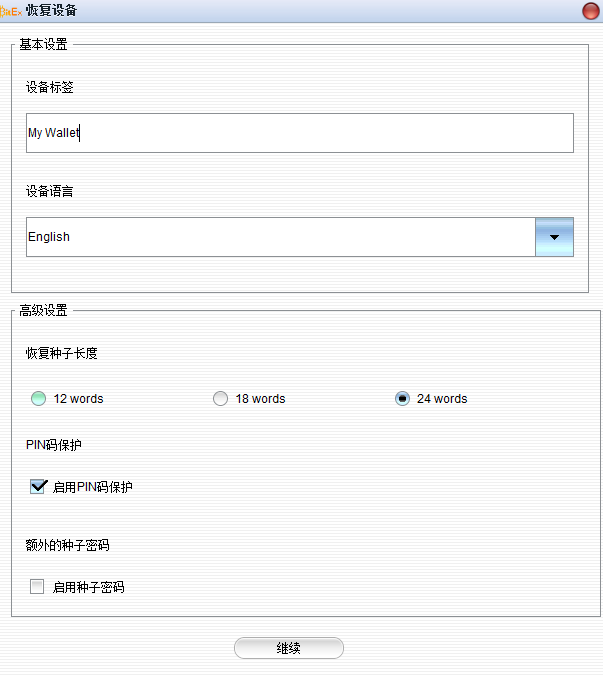
继续
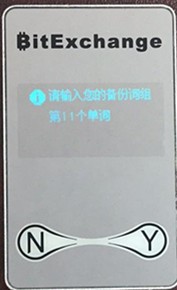
设置PIN码的操作在已经在快速入门中已经讲过,不再重复。如果需要请查阅1.2 按要求输入种子需要查看BitExchange核盾钱包 设备屏幕配合完成。如下图
Continue
The operation of setting the PIN code has been already mentioned in the quick start and will not be repeated. If need please refer to 1.2 Enter the seeds as required to view the device screen with the completion. As shown below:
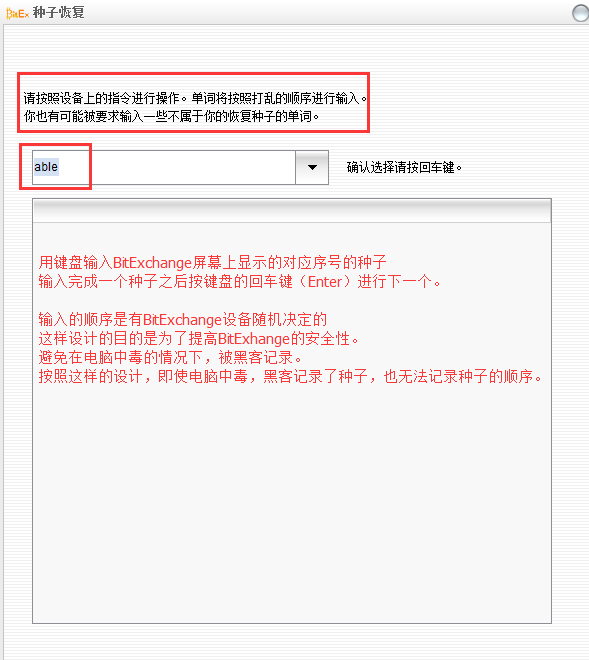
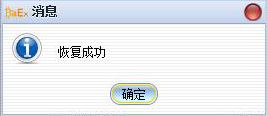
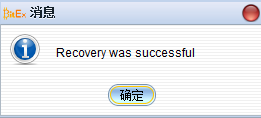
按要求输入完成之后显示“恢复成功”
After the input is completed, it shows “Successful Recovery”.
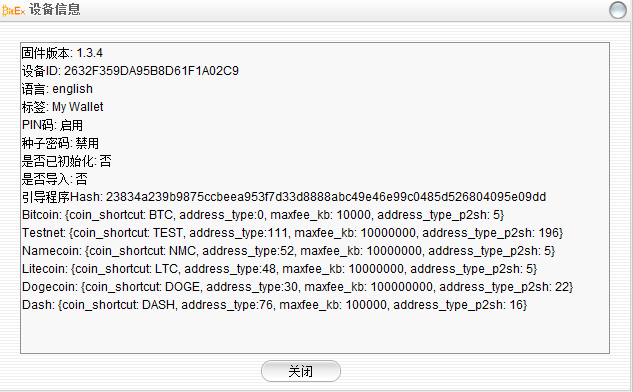
2.4 设备信息 Wallet Information
这个功能是用来查询一些BitExchange核盾钱包 的设备信息和用户设置内容。包括:固件版本、设备ID号、语言、自定义标签名称、是否启用PIN码、是否已经初始化、引导程序(Bootloader)的Hash值,等等。
This function is used to query device information and user settings.
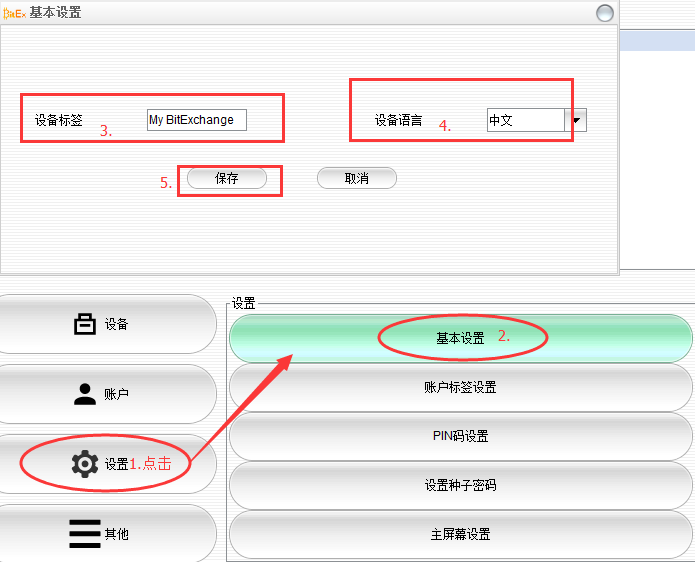
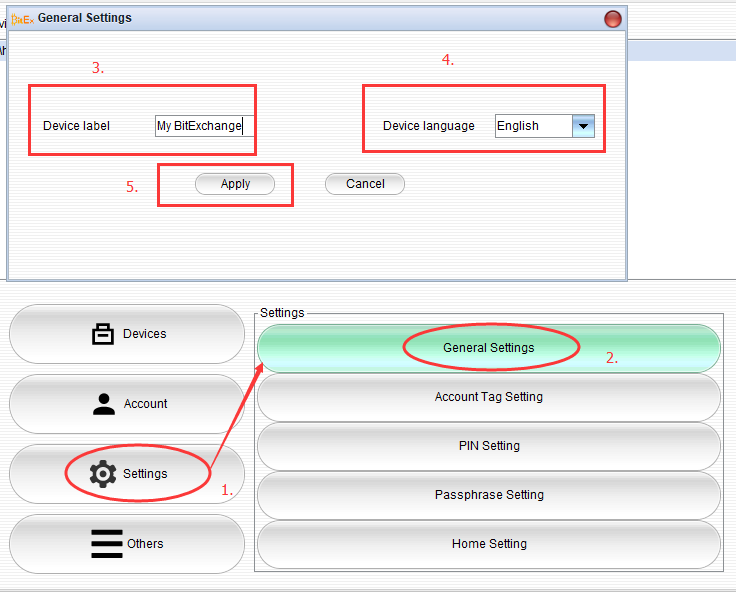
2.5 基本设置General Settings
用于修改两个用户设置:设备标签、设备语言。
Used to modify two user Settings: device label, device language.
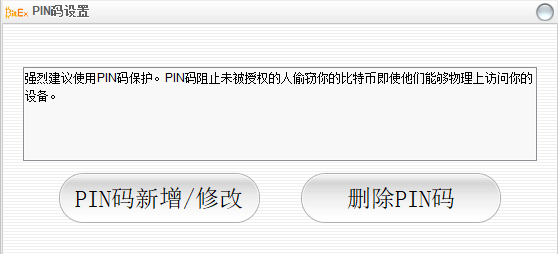
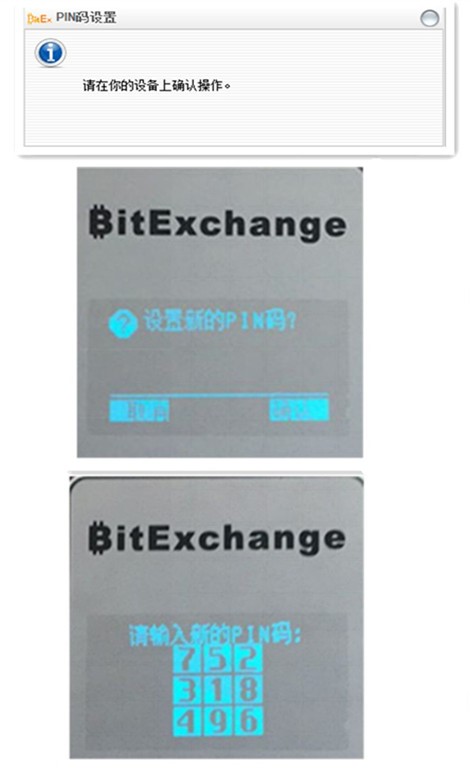
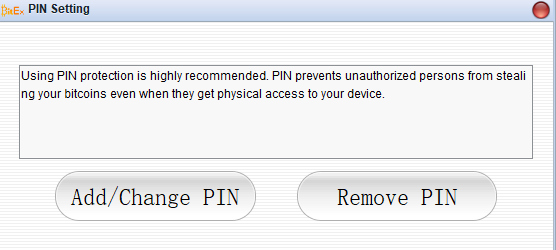
2.6 PIN码设置 PIN code Settings
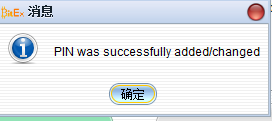
1、新增PIN码:初始化BitExchange核盾钱包 时如果没有启用PIN码,可以通过这个功能启用并设置PIN码;
2、修改PIN码:修改PIN;
3、删除PIN码:清空PIN码。不建议,因为如果没有PIN码,等于任何人拿到您的BitExchange核盾钱包 设备都可以操作您的比特币资金。
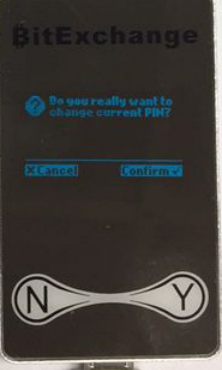
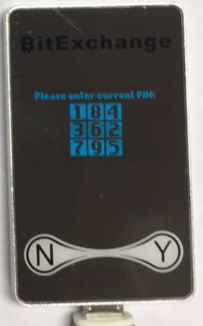
这三个操作都需要配合BitExchange核盾钱包 设备才能完成操作。操作前都需要设备按钮确认。新增/修改PIN码都需要查看BitExchange核盾钱包 设备上的显示的九宫格。
1.Add PIN Code: If you do not enable the PIN code when initializing the e-wallet, you can use this function to enable and set the PIN code;
3.Delete PIN Code: clear the PIN code. Not recommended, because without PIN code, anyone can get your electronic wallet.
These three operations need to cooperate with the electronic wallet to complete the operation. Equipment button confirmation is required before operation. To add/modify your PIN, you need to check the displayed square on the BitExchange nuclear shield wallet device.
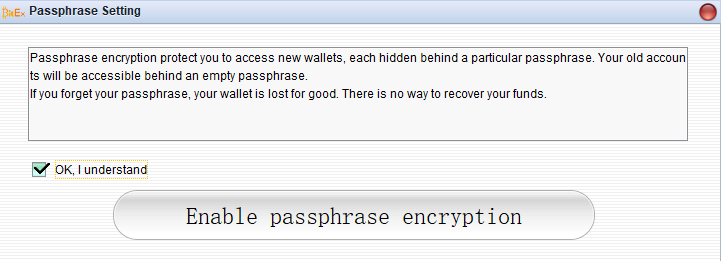
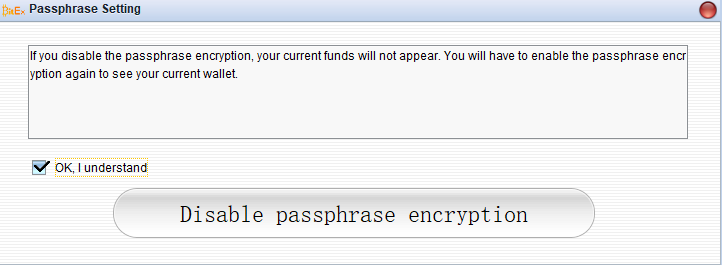
2.7 种子密码设置 Passphrase Setting
种子密码设置 Passphrase Setting
启用和禁用种子密码(passphrase),设置过程中需要BitExchange核盾钱包 设备上按钮确认,如果BitExchange核盾钱包 设备已经启用PIN码保护,还需要输入PIN码。
Enable and disable the passphrase. During the setup process, you need to confirm the button on the Wallet device. If the Wallet device has PIN protection enabled, you need to enter the PIN code.


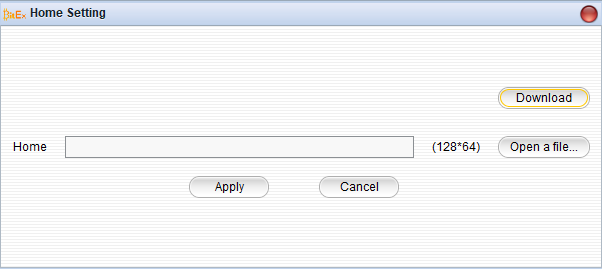
2.8 主屏幕设置 Home Setting
设置主屏幕图片 Home pictures setting
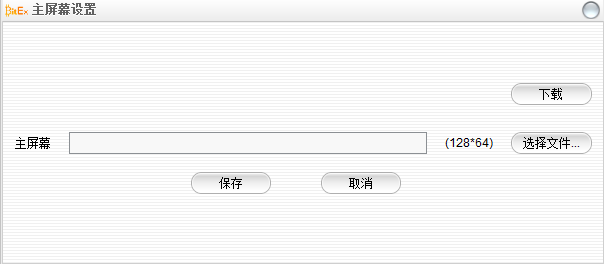
主屏幕图片文件获取途径: Main screen image file access:
1)网上下载现有的
2)您也可以自己制作像素为 128*64 的黑白 PNG 图片。其中乐趣可以慢慢摸索。
How to get the home pictures?
1)download from internet
2)Make a 128*64 PNG pictures by yourself.
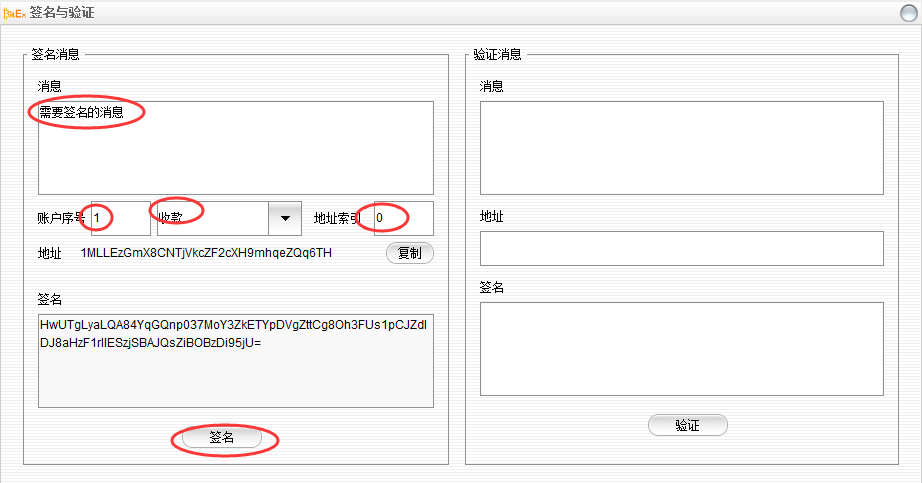
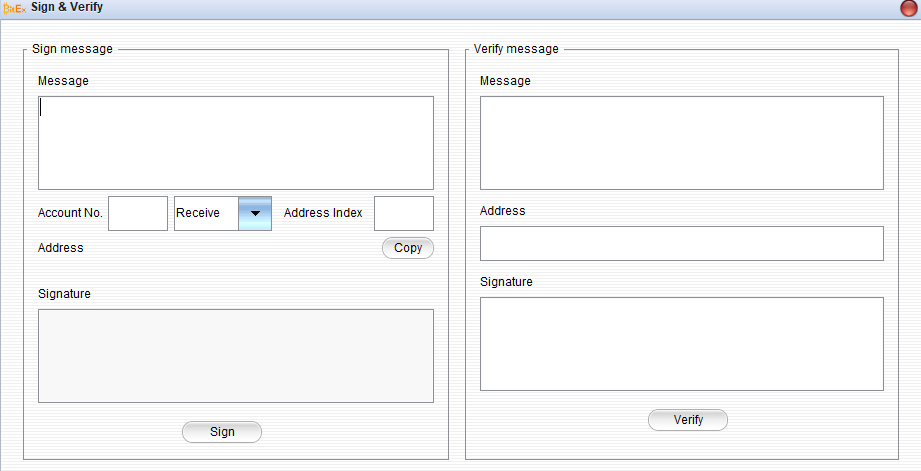
2.10 签名与验证 Sign&Verity
签名:需要配合账户中查询的地址来签名,比如我需要用第一个收款地址签名,那么就应该如下图。
Signature: it needs to be signed according to the address in the account. For example, I need to sign with the first collection address, so it should be as follows.
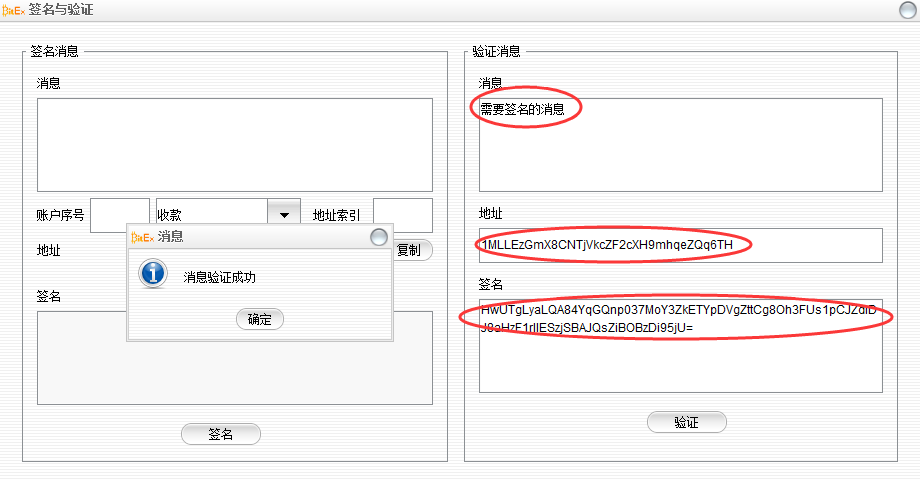
验证:验证过程如下
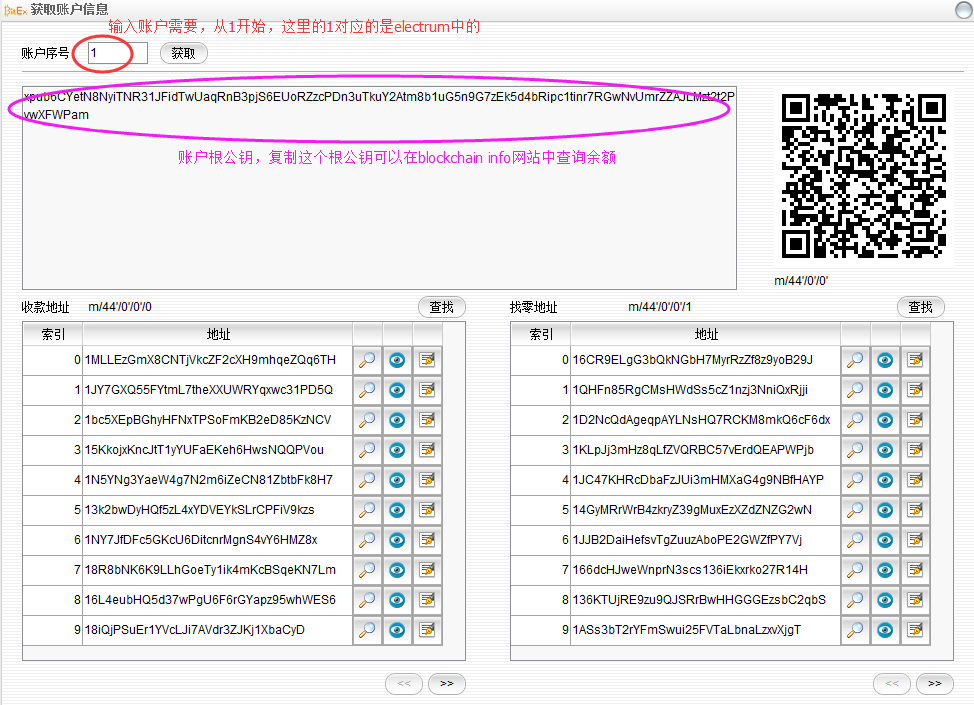
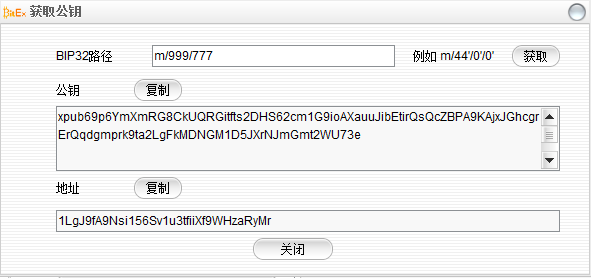
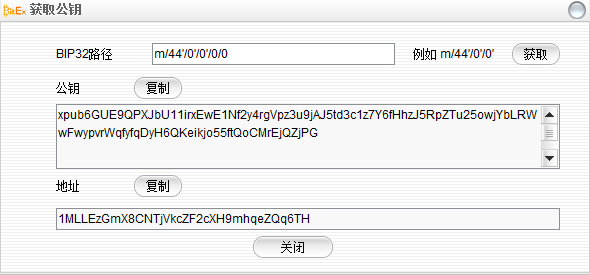
2.11 获取公钥 Get Public Key
BitExchange核盾钱包 同时支持BIP32和BIP44规则,输入相应的BIP32路径可获得对应的公钥和地址。如图:
Account root public key, copy can check the balance in the website.
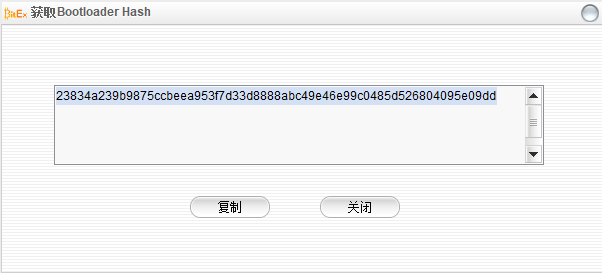
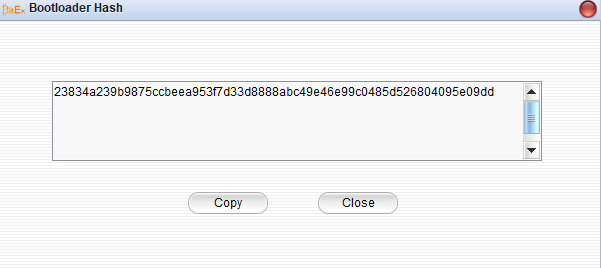
2.14 取Bootloader Hash Get Bootloader Hash
示例: Bootloader Hash:23834a239b9875ccbeea953f7d33d8888abc49e46e99c0485d526804095e09dd
我们建议用户在使用BitExchange核盾钱包 之前验证Bootloader Hash,以验证您的BitExchange核盾钱包设备是原装正品。
We recommend that users verify Bootloader Hash before using BitExchange wallet to verify that your BitExchange wallet device is genuine.
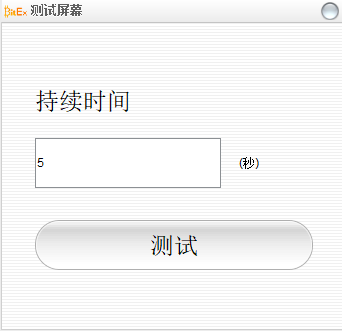
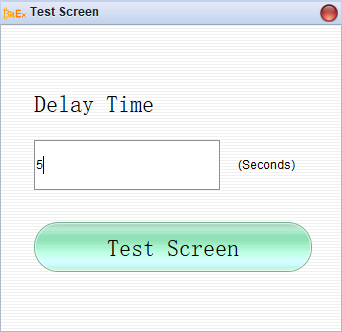
2.15 测试屏幕 Test Screen
检查BitExchange核盾钱包 设备的屏幕是否正常,排查屏幕坏点。 BitExchange核盾钱包的屏幕分辨率是96*64,设置持续时间,BitExchange核盾钱包 设备屏幕会现实一个96*64个点组成的一个长方形。如果发现有坏点不显示,建议你停止使用这个设备。以避免不必要的损失。
Check whether the screen of the device is normal and troubleshoot the screen. If it is found that there are bad spots, it is recommended that you stop using this device. To avoid unnecessary losses.
3. BitExchange 核盾钱包 高级进阶
3.1 种子密码
种子密码的启用和禁用方法可参考 2.7
如果您选择的是 24 个种子并且启动了“种子密码”,最简单的理解方法:种子密码就是第 25 个种子。并且种子密码是不保存在 BitExchange 核盾钱包硬件中的。因此:
1)种子密码没有对错之分,输入不同的种子密码得到的是不同的钱包。这一点加以利用可 得到多个钱包;
2)每次物理链接 BitExchange 核盾钱包 都需要输入“种子密码”,因为只有补齐种子密码 BitExchange 核盾钱包 硬件内部才能得到根私钥并开始工作;
3)启用和禁用种子密码,对应的完全是不同的两个钱包。当然您也可以通过启用了禁用种 子密码来在这之间来切换;
4 常见问题
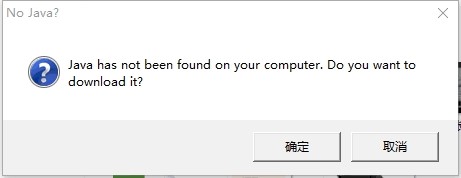
4.1 java 环境配置
JAVA 已经在 BitExchange 核盾钱包离线工具箱中打包好,以下步骤为可选可不选。 使用 BitExchange 核盾钱包 离线工具箱的时候如果出现下面的提示则说明 Java 环境配置不 正确
解决步骤:
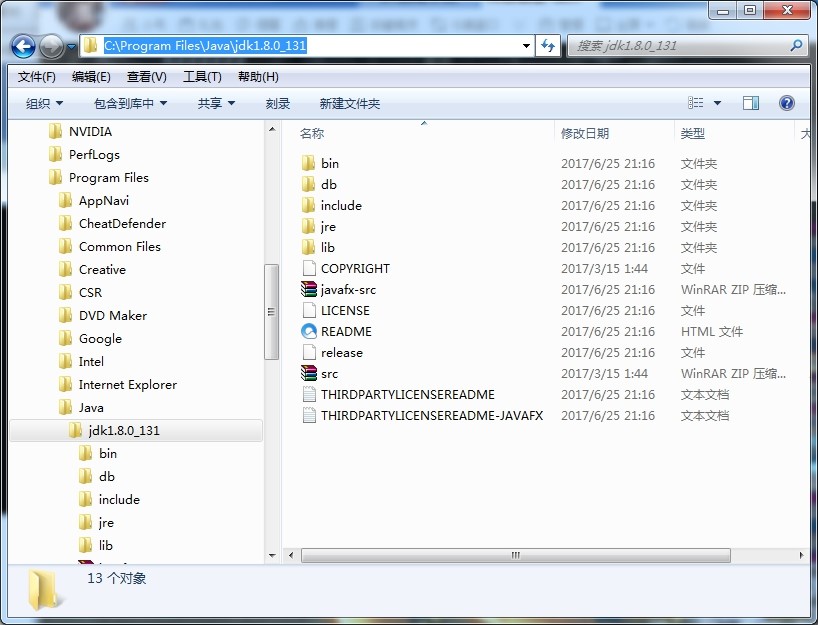
1)从 http://rj.baidu.com/中搜索“Java SE”下载,并依照步骤安装。(并记录好您 Java 的安 装路径)

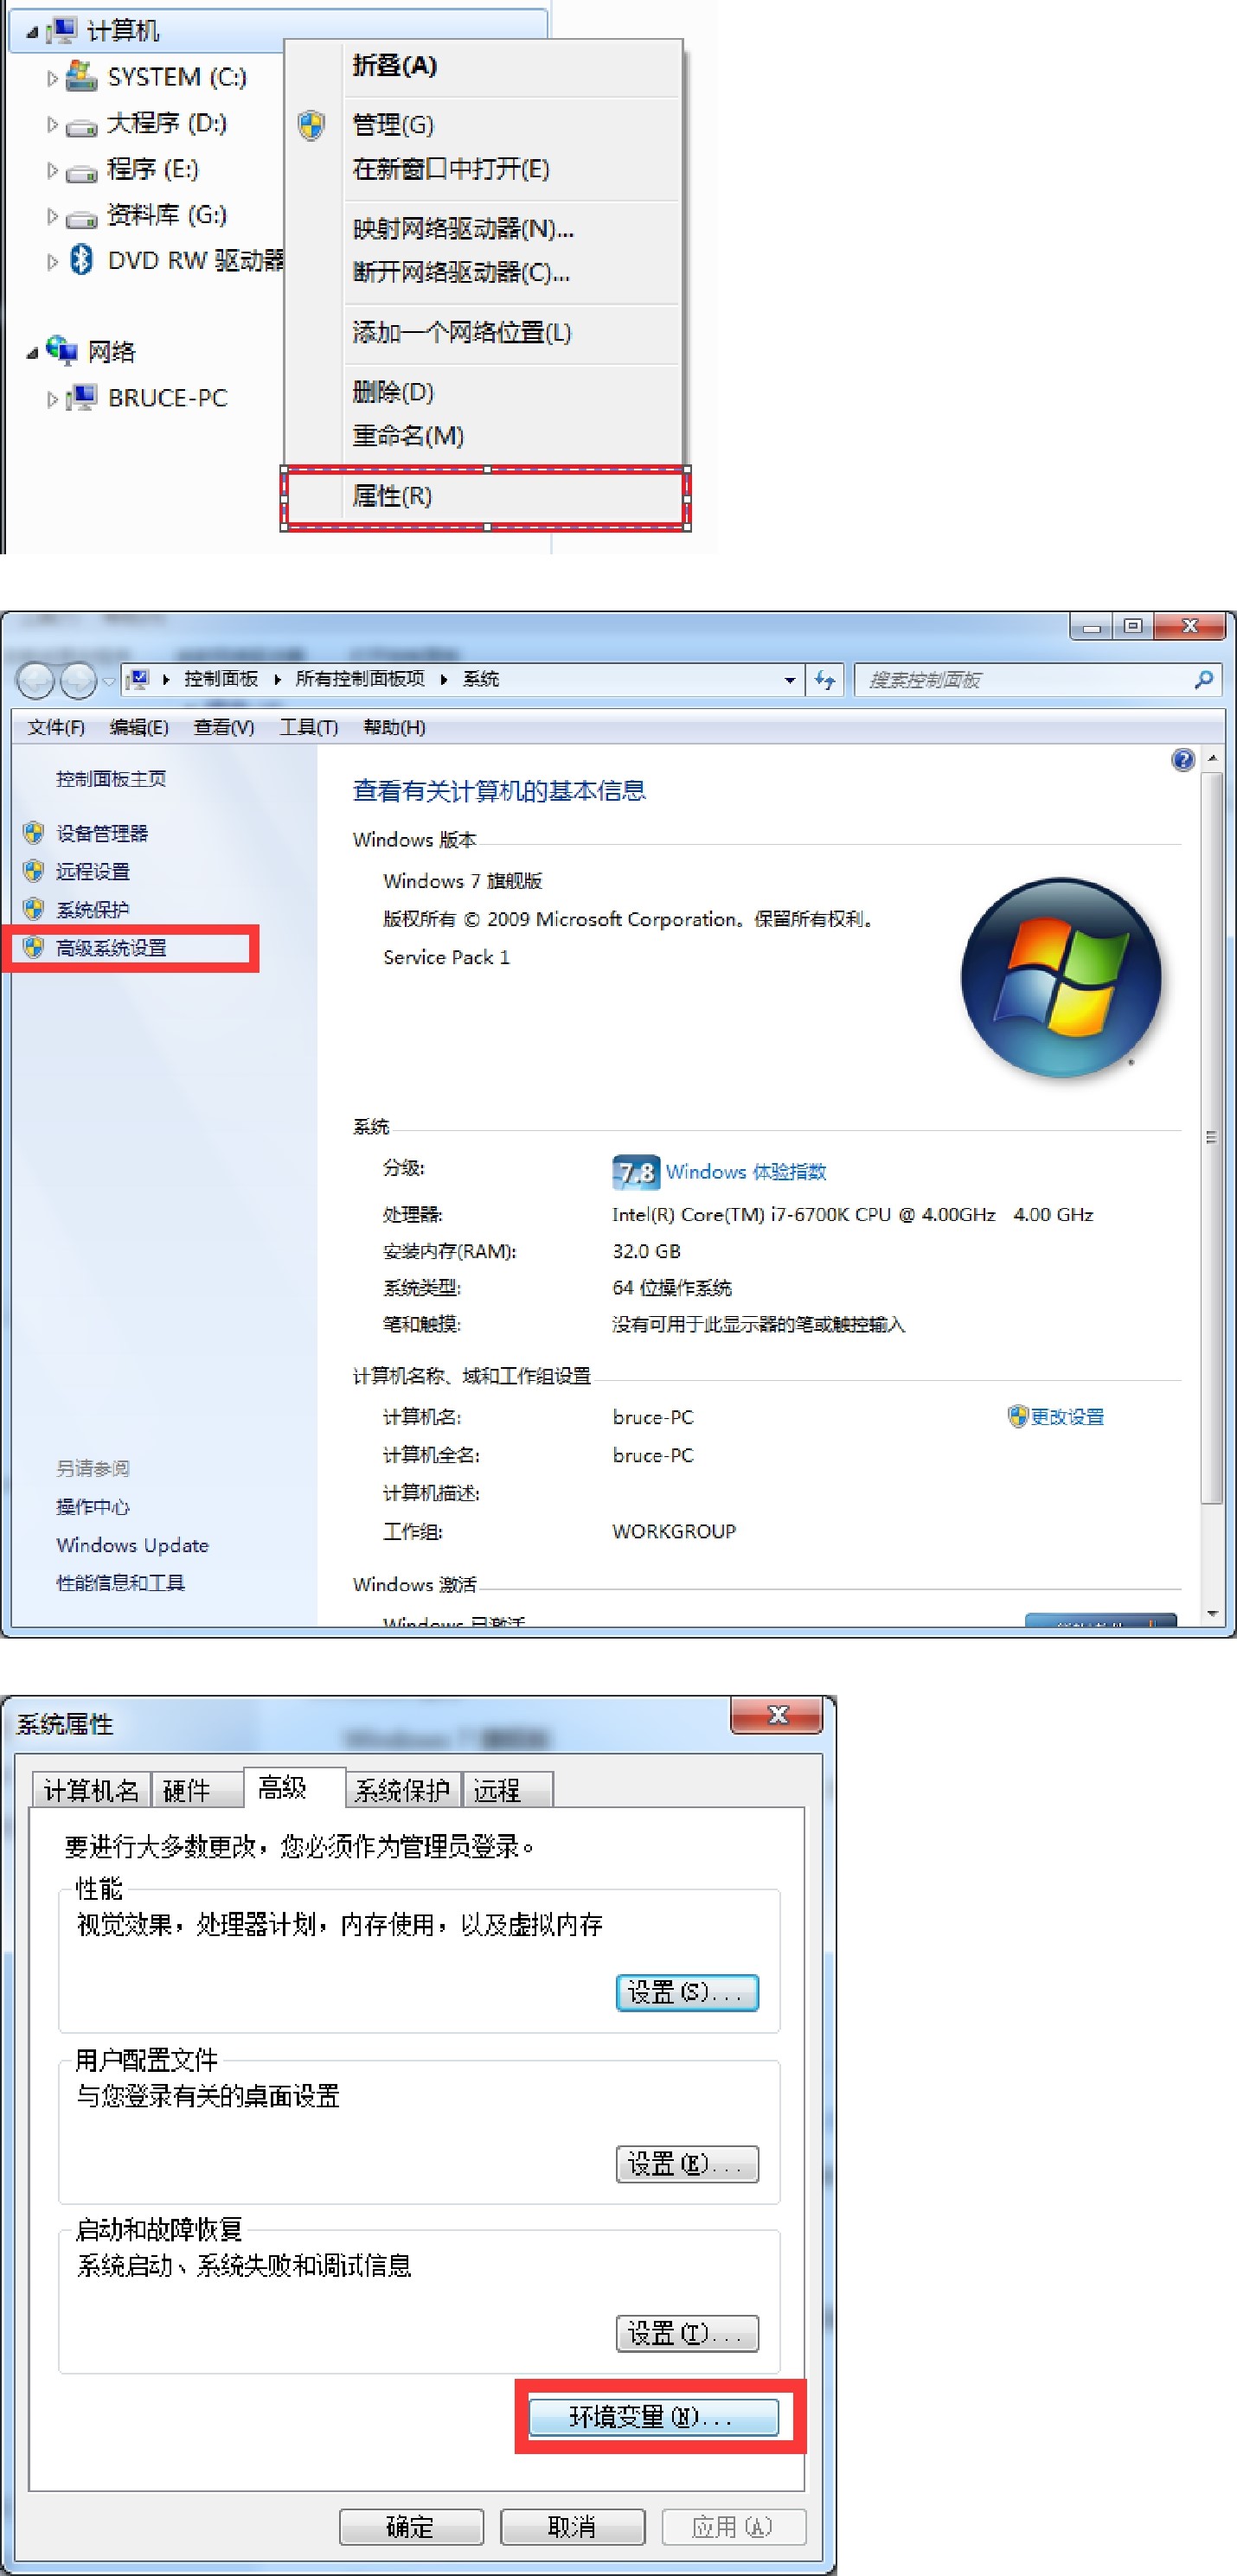
2)增加路径到系统环境变量中
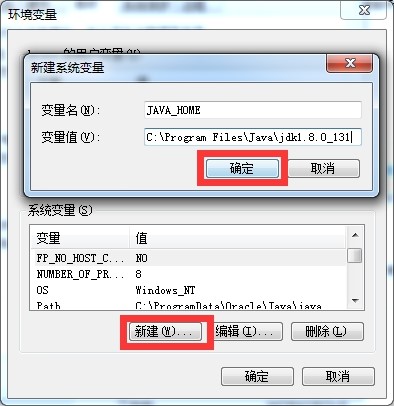
增加”JAVA_HOME”
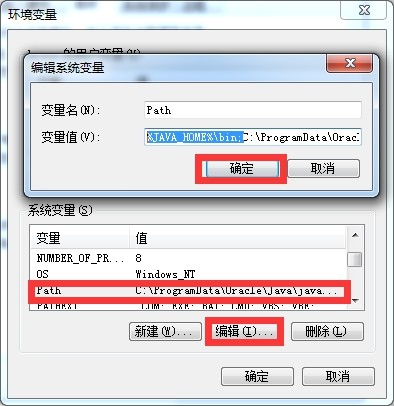
修改系统变量中的 Path,在变量值的最前面增加
%JAVA_HOME%bin;
注意大小写,最后的分号也不要漏了
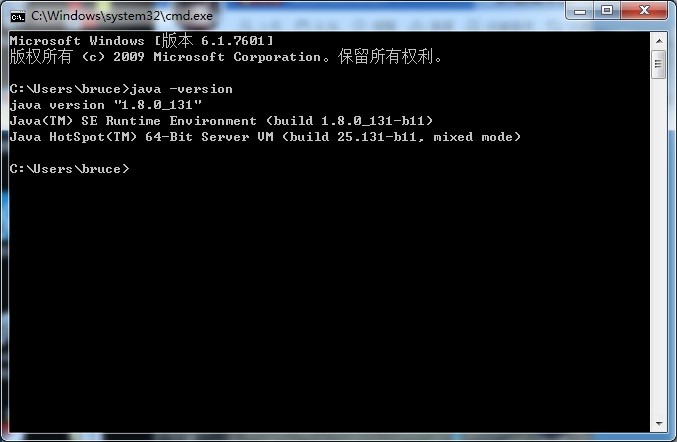
完成之后,确认。然后重启电脑即可。 验证方法:windows 键+R,输入 CMD,回车。进入命令行,然后输入 java -version 回车,返回如下,则说明成功。
如果不是则需要核对您在配置变量值的时候,路径是否正确。
5.更多支持 More support
www.hardid.org